Feeling Korea-sick

Our favourite Galbi (Korean BBQ) place in Gokbanjeong-dong, Suwon. It has since closed down; such a shame!
Sometimes I get Korea-sick. It’s not like being homesick, since Korea was never really “home” to me, but I did live there for nearly three years and it was the first foreign country I had ever visited. It holds a special place in my heart.
Patrick doesn’t get Korea-sick like I do. He was well traveled by the time he arrived, having finished backpacking the old silk route, from Istanbul to Beijing, and most of Nepal and India. He’d seen a thing or two at that stage, including a holy man in India who told him he’d meet his future wife in the coming year, would have four children (!) and would live to a ripe old age. True to form, we met the following year. We’ll see how many kids I’m willing to pop out after this one.
Korea, for me, was something entirely new and exciting. I had to learn a completely different way of life, I spent a huge chunk of my time teaching (something, after having my mom teach me my whole life, I had vowed never to do) and I had to learn new mannerisms. It was important for me to learn as much as possible about the culture – you see a lot of foreigners in Korea who don’t bother, and it’s painful to watch.
That was part of the excitement of living in a new place. It was also my first experience living in a city – I had to learn how to use a cell phone and public transit for the first time – and my first real experience with foreign food.
In Nova Scotia, at least, outside of Halifax, we don’t have a lot of ethnic food. It’s getting better now, but when I was growing up the most exotic meal you could get were the spicy noodles at Wong’s, the Chinese food restaurant in my hometown (I still often crave those spicy noodles; they’re so, so good). Sesame oil was a flavour I had to get used to, and it took about six months for me to like kimchi, the staple of any Korean’s diet.
After I started eating kimchi, though, a whole world of Korean flavours opened up to me. Kimchi Jiggae, a hot stew made of (you guessed it) kimchi with soft tofu, green onion and pork or tuna, Pa and Kimchi Jeon, which are Korean-style pancakes, often made tastier with the addition of “hae-mul”, or seafood. Bulgogi, dakgalbi, jjimdak, bibimbap and mandhu all became much-loved meals.
I started craving rice – just plain, Korean-style rice – regularly, as it had become a real comfort food for me. During my first months of pregnancy, I couldn’t eat anything – but Patrick could always convince me to down a bowl of Kimchi Jiggae with rice no matter how sick I felt.
A massive meal of ssamgyupsal (BBQ-ed pork belly) and beer or soju has been our date night of choice for years now. Every major occasion calls for it – weddings, birthdays, going-away parties. So yes, I get Korea-sick quite a lot, especially now that I live in a place with no Korean restaurant (Dear Koreans: Please move to Waterford and open a restaurant. PLEASE.).
For more Korean stories, you can check out my very first blog, ever: Getting My Suwon (don’t judge; I had no idea what I was doing!).
Since I’m having one of those days, I invite you to commiserate. Photos of some of my favourite Korean meals:

Korean-style Chinese food

Shabu Shabu! Boiling broth with thinly sliced raw beef to dip in, followed by noodles when the beef and veggies are eaten.

Buying produce off the ground never tasted this good.

The necessary drinking glasses at any Korean BBQ establishment: beer, water & soju.

Street food in Namdaemun Market, Seoul

Red Mango, my favourite froyo OF ALL TIME. The toppings are unreal. It’s expensive but so worth it.

Gamja Jeon, potato pancakes. Killer.

It’s sometimes best not to read menu translations. Itaewon, Seoul.

Homemade songpyeon for Chuseok (Korean style Thanksgiving)
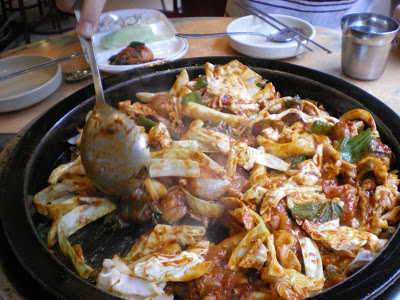
Dak Galbi (chicken with chili, cabbage, onions, rice cake) in Jongno-gu, Seoul

Korean wedding food. I went to a lot of Korean weddings. These banchan (side dishes) are just for snacking during the ceremony. The real meal happens after!

Dak Galbi in it’s raw state, with a chilled radish soup on the side.

Waiting for our Kimchi Jeon (Kimchi pancake) to arrive we sip on Makkoli (fermented rice alcohol, served chilled in a teapot, drunk from a bowl, looks like milk).

Beachside ssamgyupsal on the island of Muuido.

Street food in Busan – ddeokbokkie (spicy rice cake), kimbap and fried mandhu (pork or kimchi dumplings).

We had this delicious clam Jiggae (stew) after a long hike in Jeollnam-do

Kimchi Jiggae in Baengyeongdo (an island off the coast of North Korea).

Donkatsu in Baengyeongdo, plus banchan (breaded pork cutlet and side dishes).
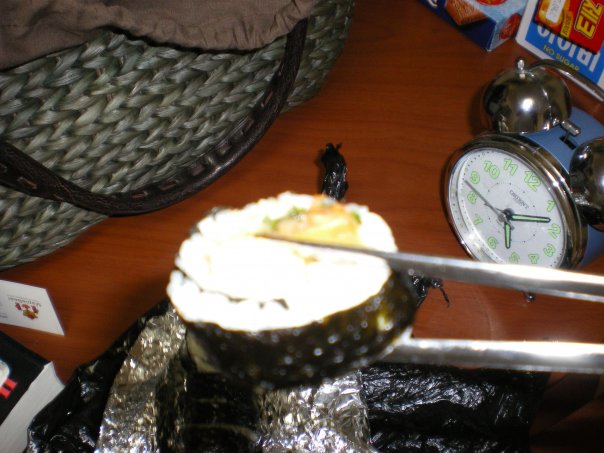
My first ever Korean meal, Kimbap (rice, ham, egg, pickled radish, root veg) at 5AM. Jetlag.

Typical “service” (meaning: free) bar snack in Korea – squid jerky with ketchup and mayo!