Skip to content

Archive for

Spaetzle

The first time I ever made, or even heard of, spaetzle was during culinary school. My idea of German/Eastern European cuisine was pretty skewed, at that time. I thought of sausages, schnitzel – the usual suspects. I never realized how hearty, comforting and delicious Eastern European food could be.

Everything changed after I made spaetzle for the first time – a world full of warm, bacon-laden sauerkraut, white asparagus, zingy potato salads, paprikash and head cheese (yes, even head cheese) was opened up before my eyes. I never looked back, and Eastern European remains extremely high on my list of favourite ethnic foods.

A soft, eggy, noodle-type dish, spaetzle is something Patrick repeatedly asks me to make. You can have it plain with butter, mix in soft cheeses or pair it with grilled or roasted meat. At the restaurant where I used to work, we would make huge batches of spaetzle, then, to order, would sear it in a hot pan with some spinach and caramelized onion. A large portion of perfectly braised, falling apart pork shoulder would be placed on top, followed by an apple gastrique. It was one of my favourite dishes and is still on the menu, as far as I can recall (if you’re in Toronto, the restaurant is called Bannock).

8889914184_e05a684700_z

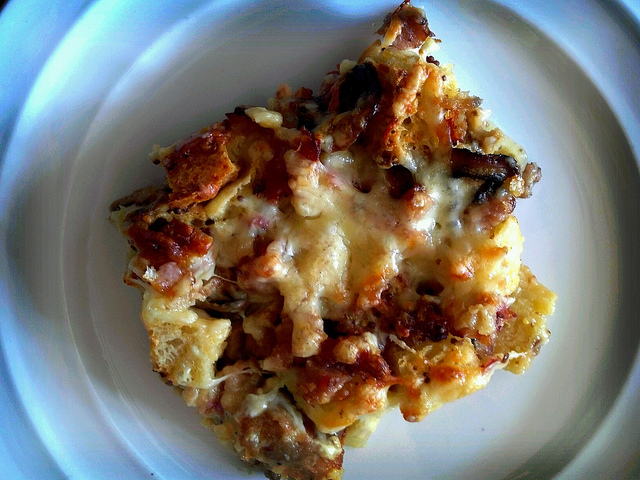
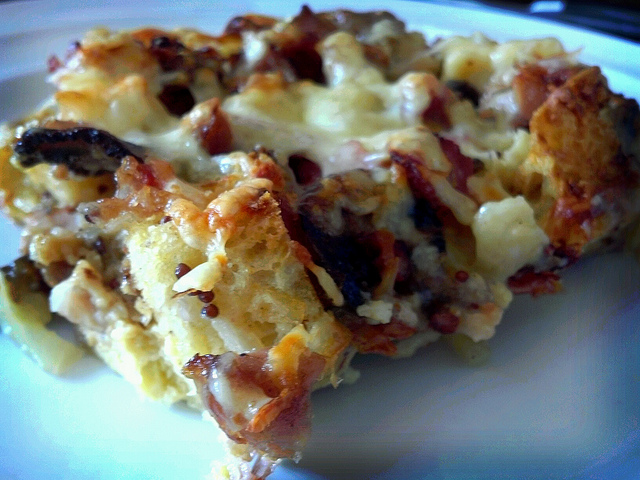
At home, our favourite way to eat spaetzle is with chèvre and caramelized onion. Since I usually serve it with roasted pork, I also like to throw in the pan juices to make it extra creamy and savoury. Like I said, Pat asks me to make this all the time, but I don’t because it’s not the easiest thing to clean up after. There is a special tool called a “hopper” which makes spaetzle-making a lot easier, but I have yet to invest in one. The way I make it at home is how we made it at the restaurant – with a palette knife and a clean, plastic cutting board. You can also use a colander and a spatula, but it’s just as messy.

Like anything delicious, it’s worth the effort (and prying batter off the gas range for the following week). We had a gorgeous meal last night of roasted pork loin, goat’s cheese and caramelized onion spaetzle and a red cabbage slaw I made the day before.

8889295025_bd68a8b97e_z

Spaetzle

Ingredients:

2 cups all purpose flour

2 eggs

1 cup whole milk

2 tsp salt

1 Tbsp grainy dijon mustard

Directions:

  • In a large bowl, add the eggs, flour, mustard, salt and half the milk.
  • Using a hand mixer or stand mixer, beat the batter. It should look like a thick pancake batter. If it’s too thick, add the rest of the milk, bit by bit, until you get the right consistency.
  • Put a large pot of salted water on to boil.
  • When you have the right consistency, continue to beat the mixture for about three minutes on medium speed. You want to develop the gluten in the flour.
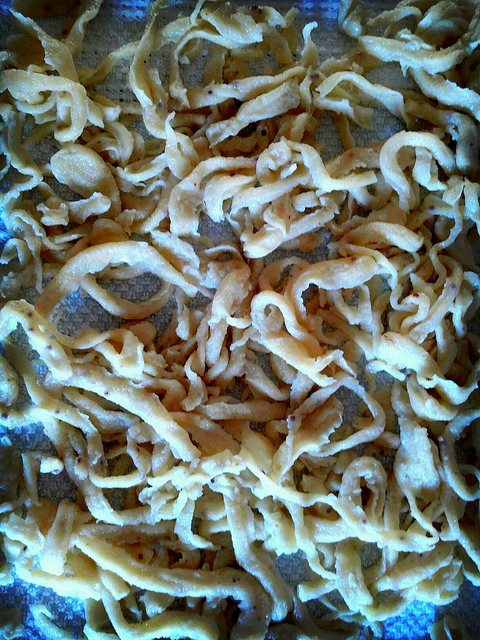
  • When the water is boiling, put a ladle-full of batter on a clean plastic cutting board. Using your palette knife, spread batter evenly over the cutting board. Then, also using your palette knife, scrape ribbons of batter into the boiling water. Alternately, you can add a ladle-full of batter to a colander (or any perforated object) and press droplets of batter through the holes with a spatula, directly into the boiling water. If using a hopper, you’re set for life. Just add the batter into the moving compartment and scrape it back and forth, directly over the boiling water.
  • Boil the droplets/ribbons of batter  until they float to the surface. This will only take about 30 seconds or less and you do not want to overcook the spaetzle. Only boil one ladle-full of batter at a time.
  • Using a perforated spoon, remove the spaetzle from the boiling water and set on a baking tray lined with a clean dishcloth to cool, if you don’t plan on serving them right away.
  • Repeat this process until all the batter has been used and don’t get too upset when you realize half the batter is now all over your kitchen counter and stove top.
  • Reheat with caramelized onions and chèvre, or butter and spinach, or anything else you’d like! Just check the seasoning before you serve.

Kit Kat Birthday Cake

8852094345_89b1ae4682_z

I’ve made a lot of birthday cakes in my day, but I’ve never made one for a kid. Now that I live in the same country as my two nieces, the job of “birthday cake-maker” fell to me this past weekend.

“How difficult can that be?”, you might be wondering. Well, as the “auntie who can cook” I had certain standards expected of me. The cake couldn’t come from a box, but it’s for a kid, so it should probably taste like one that comes from a box. It couldn’t be smothered in cream and fruit; that wouldn’t be fun enough. It needed a bit of a “wow” factor, since, until the niece in question spends the weekend with us next week she wouldn’t be getting a present.

Anyway, I love putting unnecessary pressure on myself. Can you tell?

In the end, I decided to make things a bit easier. We’ve all seen the Kit Kat Cake on Pintrest, right? It looks pretty impressive, but from a cake-maker’s perspective it’s not that difficult to make. Just a basic cake, iced and then covered in Kit Kat sticks and M&M’s. Tie a ribbon around the Kit Kats when you’re done and you have a very festive cake, perfect for a candy-loving ten year old.

I thought a chocolate cake covered in chocolate icing and chocolate candy bars might be a bit “overkill”, so for the cake I made Smitten Kitchen’s Best Birthday Cake. It was perfect – the end result actually tastes like a yellow cake mix from Duncan Hines and the like. Instead of using her sour cream chocolate icing (something I would love if making the cake for myself, but not so sure for my niece), I made a basic chocolate buttercream using icing sugar, cocoa powder, heavy cream, vanilla and softened butter.

8852713730_387c74f741_z

I should mention that Smitten Kitchen’s recipe makes a BIG cake. If all that batter went into two 9 inch layers, it wouldn’t work for the Kit Kat cake. When the Kit Kats are lined around the cake, you want them to be a few centimetres higher than the top of the cake. Otherwise, the M&M’s would have nowhere to go, and that would be very sad. Instead, I used two smaller sandwich tins. This recipe will make three layers of sandwich-sized cakes. I used two layers for the birthday cake and with the third, made a more “adult friendly” cake with the leftover frosting and Kit Kats.

This cake is absolutely delicious on it’s own. Simply masked in a buttercream, it’s moist and tastes of eggs, sugar, vanilla and has a tang from the buttermilk. With the Kit Kat’s and the M&M’s I found it way too sweet. The kids absolutely loved it, though, and it was well worth the effort!

8852676630_93f53a7316_z

Kit Kat Birthday Cake

Ingredients:

Two sandwich-tin layers of Smitten Kitchen’s Best Birthday Cake

3 1/2 cups icing sugar

1 cup good quality cocoa powder

1 cup softened butter

1/2 cup heavy cream

1 tsp vanilla

40 Kit Kat sticks (make sure you buy extra, though, to account for breakage)

2 large bags of M&M’s

Ribbon, Bows

Decorative Candles

Directions:

  • Once the two layers of cake have completely cooled, place one layer on a disposable cake plate (you can get them at the dollar/euro store or Bulk Barn in Canada). Place the cake plate on a cake turntable, if you have one.
  • Mix the frosting with a hand mixer or stand mixer, making sure it’s smooth and free of lumps. Put 3/4’s of a cup of frosting on the first layer. Using a palette knife, spread the frosting evenly over the top of the first layer. Sandwich with the second layer.
  • Mask the cake with the rest of the frosting, starting with the top of the cake and spreading evenly over the sides (the turntable really helps you get an even layer of frosting, and the palette knife helps sculpt the frosting around the edges – both are great investments if you love decorating cakes).
  • Time for the Kit Kats: use a kitchen knife to separate the sticks. If you break them by hand it will look rough and uneven.
  • Carefully stick the Kit Kats around the edge of the cake. Some people leave a small space in between, but I think it looks nicer if you work your way around with the Kit Kats pressed closely together.
  • When the Kit Kats are completely attached to the sides of the cake, open the M&M’s and pour over the top of the cake. There should be enough Kit Kat overhang (did I really just type that?) to hold the two large bags of M&M’s. You shouldn’t see any frosting, just Kit Kats and M&M’s!
  • Finish the cake by tying a pretty bow around the Kit Kats. Decorate the top with decorative candles. This cake will keep for about a week if its not immediately devoured (which, let’s face it, it will be).

8852090121_ccb5757c63_z

8852085305_46969a4f7b_z

I still had the last layer of cake to deal with, so I quickly masked it in leftover frosting and smashed the leftover Kit Kats in a plastic bag with a wine bottle (that’s technically the correct way to smash things). I sprinkled the smashed Kit Kats over the top and Pat and I had dessert for a week! Not that we needed it.

The Ubiquitous Irish Fry

8852126069_13cfcba157_z

When I first came to Ireland a few years ago, it was straight from Korea where I had been living for nearly three years. I craved Western food, real beer, and being able to understand what people around me were saying.

I was slightly nervous, since I would be meeting Patrick’s family for the first time, but for the most part I was relieved to be leaving Asia and couldn’t wait to indulge in some home comforts. A real shower! In the apartments where ESL teachers live in Korea, the entire bathroom is a shower with a nozzle on the wall and a drain in the floor. A great way to keep your bathroom clean and dust-free, but it would never compare to a Western-style shower or, even better, a bath.

Being in Korea, there were obvious food items you didn’t often get to indulge in, and even when you could, the quality would not compare to that of home. Butter, for example. Cheese. Bread. Food in Korea was phenomenal and I’m always craving a good Kimchi Jiggae, but when it came to bread and dairy it just never hit the spot.

That’s why, as we descended into Dublin that cold September evening, I was looking forward to my first Irish fry.

Patrick had talked it up, of course. Actually, it was all he could talk about. He couldn’t wait to have a proper fry up. Sure enough, we stayed with Pat’s auntie that evening and the next morning enjoyed our first of many Irish fry up’s together. It was worth the 11 hour flight and the jetlag. We felt whole again.

In Ireland, a “proper fry up” always includes rashers. Rashers aren’t like the bacon we have in Canada, they’re more thickly sliced and slightly less fatty. You can still get Canadian style bacon, or streaky bacon, here, but rashers are very much loved by every Irish person I’ve ever met; you don’t see a lot of streaky bacon at breakfast.

Puddings are another component to the Irish fry. At home in Cape Breton we eat these at breakfast, too, but they’re called marag. You get the puddings in white or black – black is made with blood, and white is made without. Both are delicious, especially if they’ve been home-made. I would say the puddings are my favourite part of an Irish fry.

Sausages feature as well. They’re smaller and paler than breakfast sausages in Canada and mostly made with pork.

That’s a lot of meat on one plate, but don’t worry – usually, you’ll find fried mushrooms and broiled tomatoes as well. A sunny-side up egg or two and a few slices of Irish brown bread, and you’ve got yourself a breakfast feast that will keep you going til supper. In Northern Ireland, you can expect some potato farls thrown onto the plate for good measure.

8852685566_ff15ab1413_z

We don’t indulge in a morning fry up very often, but as our friend was down over the weekend I bought some rashers, puddings and sausages and we had them for our Saturday morning breakfast. As always, I cooked enough for about ten people (coming from restaurant kitchens I cook everything in bulk; I can’t help it). I kept the leftovers and, for our Sunday breakfast, made a lovely strata with chunks of homemade sourdough, sauteed onion, cheddar cheese and the extra rashers, sausages, puddings and mushrooms.

It tasted lovely, and was even better served with a dollop of Ballymaloe Relish. Here’s the recipe:

8852063869_71c3231b76_z

8852688314_2daf58d0b8_z (1)

Irish Fry Strata

Ingredients:

1/2 loaf sourdough or any type of bread, cut into 1 inch cubes

Leftover rashers, black/white puddings, sausages and mushrooms, roughly chopped

1/2 cup grated Irish cheddar

8 large eggs

1/4 cup whole milk

1 Tbsp grainy mustard

1 tsp chili flakes

2 tsp salt

1 tsp pepper

1 Tbsp Olive Oil

1 small onion, diced

Directions:

  • Butter a large glass baking or casserole dish. Add the cubed bread to the dish.
  • In a large pan, heat the olive oil and soften the diced onion. Add the chopped rashers, sausages, puddings and mushrooms. Heat through.
  • In a bowl, add the eggs, milk, salt, pepper, mustard and chili. Whisk until combined and frothy.
  • Add the sauteed onions, mushrooms and meats to the casserole dish, spreading evenly over the bread.
  • Pour the egg mixture over the bread and meats. Top with grated cheddar cheese.
  • Cover with plastic wrap and allow to sit overnight in the fridge. You want to bread to soak into the egg mixture completely.
  • The next morning, preheat your oven to 375 degrees (190 degrees Celsius, no fan). Bake the strata for about one hour, until the top is bubbly and golden and the casserole is cooked through.

8852066679_6632caf909_z


An Afternoon at Tramore Beach

This past weekend was busy for us.

Our very close friend, Aidan, recently moved home to Limerick after five years in South Korea. It was in Korea where we met – me and Aidan, Patrick and Aidan, even me and Patrick. Maybe someday I’ll jot down the hazy memories of the night Pat and I first met, but this post is not the place.

We had the best group of friends in Korea. Every Friday night we would gather at Now Bar in Yeongtong, Suwon and drink, laugh and plan the weekend’s mischief. Whether we’d take the 6 am train to the beach the next day or simply drink in the park (you can do that in Korea!) there would always be something fun planned, and generally Aidan would be at the center of it all. Needless to say we’re delighted to all be in the same country again.

Things have definitely changed since we last saw each other in 2009. I am as big as a house, he’s actually gotten slimmer, Pat is a super-duper professional and none of us can handle the all-night drinking binges that personified our weekend lives in Korea (during the week we were strictly business – teaching kindergarten with a hangover just doesn’t work).

In addition to trying my best to fatten him up, we had a great weekend in Waterford. On Friday evening we dined at Sabai, which specializes in high-end Thai and Vietnamese cuisine. Patrick’s coworkers assured us it was the best place in the city for Asian food and, although it can be pricey (entrées alone up to 25 euro, in some cases), they have an excellent early bird special that leaves you full and content.

For 21 euro, you can get an appetizer and entrée with tea or coffee. If you want to splurge, you can get dessert thrown in for 25 euro. In the beginning we thought we could handle three courses, but after our entrée we were so very full. I couldn’t even finish my green curry (the leftovers made a great midnight snack).

8852107757_281ecd31fd_z

On Saturday we packed up some towels and blankets, put on our bathing suits and headed for Tramore Beach. We hadn’t yet been to Tramore, but we knew it was just a few minutes down the road. Sure enough, ten minutes from our house, we found ourselves at the beach.

This beach is huge. The town? Cutesy and quaint. There is a small amusement park next to the beach as well as several surfing schools.

8852733088_a9db08e699_z

It was a great day to be outdoors – there were dogs and children running all over the place. We found a little spot to spread out our blankets and relaxed in the sun for a few hours. The boys actually jumped in the frigid water. I stuck my feet in and decided not to.

8852113869_64c3de272d_z

8852110999_04f5df4d32_z

We finished the day with fresh battered cod and chunky chips, followed by a 99 ice cream cone (or a 99 Flake). Don’t know what a 99 is? It’s an ice cream cone (generally soft serve, vanilla) with a stick of wafer-ey chocolate stuck in for good measure. It cost 1 euro, not 99 cent. Must be the inflation.

8852720518_e8e14073e4_z

8852100973_3455bb9257_z

It’s great to know the beach is so close to my house. Hopefully the wind gets less chilly as the summer goes on and I’ll actually get in the water. A girl can dream.

Prosciutto Wrapped Chicken with Lemon Ricotta & Zucchini Pasta

8800628977_aaee5a7821_z

We’ve been enjoying some beautifully sunny days here in Waterford (excluding today – I woke up to grey skies and low temperatures) and the past week has made me feel like summer is truly on it way. Even though, in Ireland, summer technically starts in May. I don’t really get it. I guess it has something to do with growing seasons? Explanations are welcomed!

So far, May in Ireland doesn’t feel any different from May in Cape Breton – temperamental weather abounds, where it’s warm and sunny one day and snowing (or hailing) the next. We’ll see how June goes.

I’m getting way off topic here! The point is, we’ve been enjoying sunny and warm weather in Waterford lately and it’s made me crave fresh, summery flavours. Hence, last night’s dinner.

I used to work the pasta station at a busy restaurant in Toronto called O&B Canteen. With the different seasons came our menu changes, and one of my favourite seasonal menu items was the pappardelle with pine nuts, zucchini, lemon, mint and fresh ricotta that we’d get in every morning, still warm, from The Cheese Boutique. We would julienne the zucchini into long strips and quickly bake it in the oven. The zucchini would entangle with the pappardelle and the whole thing tasted so fresh and creamy. Although this was a few years ago, I still crave this flavour combination when the days start to get warm.

I didn’t have time to make fresh pappardelle yesterday (can you believe it?!). I did have some fusilli in the cupboard, so instead of finely slicing the zucchini into strips, I cut them into a medium-small dice to better suit the pasta. I zested a lemon and mixed the zest into the ricotta with a bit of freshly ground pepper, salt and a few drops of habanero hot sauce. I have some gorgeous mint growing in the garden, but I decided not to go with the mint this time, since I was using sage with the chicken (everything in moderation!). I still need to plant a few more herbs – if I had some flat leaf parsley I would have thrown some into the pasta.

The chicken was very simply wrapped in prosciutto with a sage leaf and a smear of garlic mayo. I roasted it at a high temperature to encourage the prosciutto to crisp. Hope you like it!

8811206606_a8cc1d0491_z

Prosciutto Wrapped Chicken with Lemon Ricotta & Zucchini Pasta

Ingredients:

For the chicken:

3-4 boneless, skinless chicken breasts

1/2 cup mayonnaise or aioli

1 clove garlic

3-4 large sage leaves

3-4 slices prosciutto, parma ham or serrano ham (whichever you can find)

Salt and Pepper

1 Tbsp olive oil

2-3 sprigs fresh thyme

1/2 pint cherry or grape tomatoes

For the pasta:

500 g dried or fresh pasta (I used fusilli, but any will do)

250 g ricotta cheese

2 tsp hot sauce or chili flakes

Zest of one lemon

Salt and Pepper

Olive Oil

1 medium-sized zucchini

1-2 cloves garlic

Directions:

  • Preheat the oven to 400 degrees (200 degrees Celsius, no fan).
  • Prepare the chicken: mince one clove of garlic and mix with the mayonnaise or aioli. Smear 1-2 heaping teaspoons on each breast of chicken.
  • Place one sage leaf on each piece of chicken, ensuring it sticks to the mayo.
  • Carefully wrap each breast of chicken in one slice of prosciutto. Place in a baking dish.
  • Add the tomatoes to the baking dish. Sprinkle a few sprigs of fresh thyme over the top, then season lightly with salt, pepper and olive oil. Set aside.
  • Prepare the zucchini: wash and cut off both ends of the zucchini. Cut the zucchini in half, then half again. Slice each portion into sticks and then cut into a medium-small dice. Place diced zucchini on a lined baking sheet and lightly season with salt, pepper and olive oil. Place in the 400 degree oven for approximately 5-8 minutes, until tender but still brightly coloured.
  • Put a pot of water on to boil and place the chicken in the oven. Set the timer for 20 minutes.
  • Mix the ricotta cheese with the lemon zest and hot sauce, then season with salt and pepper. Finely dice 1-2 cloves of garlic and set aside.
  • Boil your pasta in salted water until al dente. In a large pan, heat some olive oil and then lightly cook the minced garlic. Add the zucchini and ricotta mixture to the pan and heat through.
  • Strain the pasta and add to the pan. Mix thoroughly with the zucchini and ricotta, then check for seasoning. You shouldn’t have to add any extra salt to this dish if you’ve properly salted your pasta water and seasoned the zucchini and ricotta.
  • Remove the chicken from the oven. Plate the pasta and garnish with the roasted cherry tomatoes. Add the chicken to the plate and pour the pan juices over the top.

Strawberry Lavender Cake

8776358693_6423a91aa1_z

I am still loving strawberry season in Ireland. I love walking into my kitchen every morning and catching a whiff of the fresh, sweet berries that now have a semi-permanent place in a bowl on my counter.

What’s more, I have never put this much thought into baking with strawberries. It was like I was in a 27 year-long groove in which I could only envision strawberries as a garnish or served with cream. My eyes have been opened; I have been enlightened – baking with strawberries is seriously fun and rewarding (read: delicious). Researching and making up some of my own recipes has been fun, too.

The idea for this cake came when I was looking into strawberry upside-down cakes. Inspired, I scattered sliced strawberries and sugar on the bottom of a spring-form cake pan and sprinkled on some lemon juice. Then, I made a simple sponge-type cake batter that I hoped would hold up well but still absorb a lot of the juice from the berries.

In Toronto, if you drive North of the city for about two hours you’ll come across a region called Prince Edward County. The terrain in this county is amazing – ideal for vineyards, cheese-making and growing all kinds of lovely stuff. I used to sell at some farmer’s markets in Toronto and would sometimes have a stand next to this guy, Derek, who owns a lavender farm. I use his Herbes de Provence mix for absolutely everything and love his dried tarragon, but have never gotten around to trying his actual baking lavender. I smuggled some into the country, though, so, thinking of it sitting in my cupboard, I sprinkled some into the cake batter. I mean, strawberries and lavender love each other. It was the right thing to do.

The end result may not have been an exact interpretation of an upside-down cake, but it was absolutely delicious as a cake in itself. The moist, springy base absorbed so much of the berry juice, but the berries themselves didn’t disintegrate – they provide lovely bursts of tart and sweet. The lavender is not overpowering. It works with the strawberries and adds a light layer of flavour.

There is one slice left, which means Patrick and I will have to have a fight to the death after dinner to decide who gets it (or we could just do rock-paper-scissors – I always win).

8776373995_d84bf651bd_z

Strawberry Lavender Cake

Ingredients:

1 pint fresh strawberries, hulled and sliced

1/2 cup sugar

Juice of one lemon

1 1/2 cups all purpose flour

2 tsp baking powder

1/2 tsp salt

1/2 cup unsalted butter, melted

1 cup sugar

1 tsp vanilla extract

2 tsp baking lavender

2 eggs, separated

1/2 cup buttermilk

Directions:

  • Preheat your oven to 350 degrees (180 degrees Celsius, no fan). Grease a spring-form pan with butter.
  • Arrange strawberry slices on the bottom of the cake pan. Sprinkle the berries with lemon juice and 1/2 cup sugar. Set aside.
  • In a bowl, whisk the flour, baking powder and salt. Set aside.
  • In another bowl, beat the melted butter with the sugar until well combined. Add the vanilla and lavender. Beat in the egg yolks, one at a time.
  • Take turns adding the buttermilk and flour mixture, stirring to combine after each addition.
  • In another bowl, beat the egg whites until stiff peaks form (if you’re having trouble with getting your egg whites to stiffen, add a bit of lemon juice to the mix once they’ve gotten to soft peaks). Stir in 1/3 of the beaten egg whites and then gently fold in the rest. Your batter should be slightly thick, like muffin batter, before adding in the whites. It should be lighter and softer after properly folding the whites in.
  • Gently pour the batter over the sliced strawberries in the pan. Bake for 45-60 minutes, depending on your oven. Check after 45 minutes. The cake should rise considerably and a toothpick, when inserted in the center, should come out clean.
  • Immediately after baking, slide a knife along the sides of the cake pan and remove the spring. Place a plate over the cake and flip. The strawberries should be on the top of the cake and there should be a nice syrup created from the juices, sugar and lemon.
  • Serve with Chantilly cream. Keep the cake covered, at room temperature, for up to 5 days (it tastes nicest on days 2 and 3!).

8782922454_4afaaabf71_z

Chunky Greek Couscous Salad

8765462450_861e802e5e_z

These past few weeks I’ve been taking a wonderfully relaxing prenatal yoga class at The Yoga Centre Waterford. There are only six women in the class including the instructor. I leave smelling like incense and feeling like I am actually going to be able to push this child out when the time comes. It’s also been helping me with some of the more annoying aches and pains that come along with pregnancy. And let’s face it, it’s nice to go out once a week and chat with some other ladies. Pat’s great, but I need some girlie time.

The class leaves me feeling so energized. It’s not strenuous like a normal yoga session would be. It focuses much more on posture, meditation and deep breathing technique. Our instructor has two grown children so it’s nice to hear what she has to say about what works and what doesn’t during labour.

The class runs until 7:30 pm, so we usually leave dinner until after. Pat goes for a long run while I’m there, so we’re always starving and craving something fresh with lots of veggies and protein for dinner.

This couscous salad is one of my favourites. It would be even better with quinoa (I freaking love quinoa), chickpeas, kidney beans or Israeli couscous, but I’m still trying to  find my way around Irish grocery stores. I saw a box of regular couscous and grabbed it without thinking twice.

Also great about this salad is that you can prepare and mix the veggies, cheese and dressing one or even two days before you serve. The longer it marinates, the better it tastes.

I’ll usually serve a grilled piece of chicken or fish with a couscous salad, but I had some pork loin chops in the freezer. I thawed them out and made a light marinade of lemon juice, olive oil, salt and pepper, sliced an onion over them and left them in the fridge for a few hours before searing them off, onions and all. I have to say, the pork was so tender and very flavourful – a good choice if you’re having a Greek-style salad. Grill the pork on the barbeque, if you have one. It will taste even nicer with a bit of char.

8765447412_95f91ed289_z

Chunky Greek Couscous Salad

Ingredients:

1 large red bell pepper

1/2 English cucumber

1 small red onion

1/2 pint cherry tomatoes

1 cup feta cheese (goat, if you can get it)

1/2 cup extra virgin olive oil

1/8 cup red wine vinegar

1 tsp oregano

1 clove garlic, crushed

Salt and Pepper

2 heaping cups cooked, cooled couscous

Directions:

  • Wash, seed and chop the bell pepper and cucumber. A rough chop is fine, but make sure they are all chopped into roughly the same size. *I usually take an extra step with the bell pepper and remove the white membrane on the inside of the pepper. Just slide a sharp knife directly under the membrane and slice it off. You don’t have to do this, but when eating peppers raw it takes away the bitterness you’ll sometimes taste.
  • Wash the cherry tomatoes and slice them in half. Peel and chop the red onion into small chunks. Mix all veg together in a bowl.
  • In another bowl, add the finely crushed/chopped garlic clove, red wine vinegar and oregano and whisk together. In a slow drizzle, add the olive oil while whisking constantly. Season the dressing with salt and pepper to your taste, and pour directly over the vegetables (the dressing may taste overwhelmingly of olive oil and the vinegar should taste strong – once you add the bland couscous everything will even out).
  • Crumble the feta cheese over the vegetables and mix. Cover the bowl with plastic wrap and leave to marinate for several hours or overnight.
  • A few hours before serving, pour some boiling water over dry couscous in a mixing bowl (I do 250 grams of dry couscous and 400 ml of boiling water). Cover the bowl immediately with plastic wrap and leave for ten minutes before fluffing the couscous with a fork and leaving to cool.
  • When the couscous is completely cool, mix it in with the marinated feta and vegetables. Check for seasoning and add more salt/pepper if necessary. Garnish with freshly chopped flat leaf parsley or a handful of baby rocket (ours came fresh from the garden – it was delish!).

Farm-Style Brown Sugar Cookies

8763464021_4ef749e4dc_z

When I was a little girl (actually, for my entire life until I turned 18), I spent a lot of time at my Aunt Joan’s house.

She babysat me when I was younger, and living just down the road from me, her house was a usual stop after school or when I needed a place to stay for the night. She and my Uncle Allister had a farm where they raised pigs, chickens and cows. Uncle Al grew potatoes.

There was never very much “kid stuff” at Aunt Joan’s, but there was always something fun to do. My cousins were all quite a bit older than me and would take me for drives and buy me treats. I would go picking wild blueberries with Aunt Joan in the summer. Sometimes I was allowed to help bring the cows home in the evening. There were always kittens in the barn, if you were fast enough to catch them. And Annie, who was Uncle Allister’s mother and lived in the house, loved me like her very own grandkid. She played cards with me and taught me how to knit when I was six.

One of the best things about going to Aunt Joan’s house, though, was the food. Aunt Joan is an amazing cook. Whether something as simple as a cold cut sandwich or a full blown roast dinner, she just knows how to make food taste amazing. Even though I was a picky eater when I was young, at her house I would clean my plate and always have a glass of milk with dinner.

Which leads me to the cookies. Aunt Joan always has these amazing brown sugar cookies in the cookie jar. They’re the most simple cookie in the world, but they’re also just what you want in a cookie – moist and sweet; you can taste every component in them. It’s like brown sugar and butter had a delicious baby.

I add the lemon zest to the cookies for an extra zing, but they are just as good without. I like to make a double batch and then freeze them, taking out a few at a time as the craving strikes.

8766108536_518dfa598f_z

Farm-style Brown Sugar Cookies

Ingredients:

1 cup butter, softened

1 cup brown sugar

1 tsp vanilla

Zest of one lemon, finely chopped

1 egg

2 cups all purpose flour

1 tsp baking soda

1/4 tsp salt

Directions:

  • Preheat the oven to 350 degrees (180 degrees Celsius, no fan).
  • In a large mixing bowl, cream the softened butter into the brown sugar. Mix until light and fluffy.
  • Add the egg, lemon zest and vanilla. Mix well.
  • In a separate bowl, whisk together the flour, baking soda and salt.
  • Add the dry ingredients to the butter mixture all at once. Using your hands, a large wooden spoon or the paddle attachment on your stand mixer, bring the flour and butter mixtures together until a pliable dough has been formed.
  • Using heaping tablespoon’s full of dough, form into little balls.

8765434172_8f61e9c63b_z


8765426214_f2f8c4f25a_z

  • Flatten the dough balls with a fork.
  • Bake for 10-15 minutes (check after 10). They should be golden brown, but still quite moist.

8763455309_0ebd221cf4_z

Baked Apple Pancake

My favourite desserts are, usually, very simple.

If Patrick and I go out for ice cream, he will almost always choose an elaborate flavour – like caramel fudge donkey tracks – and will laugh when I order a plain vanilla in a waffle cone. While some folk enjoy extra chocolate chunks in their chocolate brownie (with chocolate frosting, of course), I prefer a moist, plain brownie topped with cream.

This blog is, so far, quite dessert heavy, so I will understand if you want to call me a liar, but I’m just not into crazy, multi-component sweets. Getting into my seventh month of pregnancy, though, I have been – let’s say – craving sweeter things as of late. When dinner is finished and there’s no cake or ice cream in the kitchen, I feel incomplete. Patrick says it’s because I’m having an Irish baby (did you know, alongside Weetabix, that the Irish are very fond of cake? Like, more so than most people.).

There are ways to satisfy my cravings without having a huge chunk of cake for dessert, thankfully. This baked apple pancake is one of them. It has very few ingredients and is leavened using stiffly beaten egg whites. The caramel-apple topping is the source of the sweetness and the base is oh-so light and fluffy. It’s perfect with a cup of tea, or if you’re feeling extra-naughty, a scoop of vanilla bean Haagen Dazs. Since it’s made with stuff you’ll probably have in your pantry, it’s also a great dessert to make if you have unexpected company (it literally takes 15 minutes of your time, from start to finish).

Like all of my favourite desserts, it is simple. But why over-complicate such a wonderful thing? For all its simplicity, it is a perfect, light dessert – made for sharing.

8757575792_be0319e632_z

Baked Apple Pancake

Ingredients:

For the caramel:

2 Tbsp butter

2 Tbsp brown sugar

1/2 tsp cinnamon

1 Granny Smith (or any baking) apple, peeled and sliced

For the pancake:

2 2/3 Tbsp all purpose flour

Pinch of salt

2 eggs, separated

2 2/3 Tbsp milk

2 2/3 Tbsp sugar

Directions:

  • Preheat the oven to 400 degrees (200 degrees Celcius, no fan).
  • In a cast iron frying pan (or any pan that you can put in the oven), melt butter over medium heat. When the butter is melted, sprinkle the brown sugar and cinnamon into the pan, followed by the apple slices.
  • Cook the apple slowly, allowing the sugar to caramelize, over medium-low heat for five minutes.
  • In the meantime, mix the flour, salt, egg yolks, milk in a bowl until well combined.
  • In a separate bowl, whisk the egg whites until soft peaks are formed. Add the sugar and continue to whisk until stiff peaks are formed and the whites are able to hold their own shape.
  • Mix a third of the egg whites directly into the batter, then slowly fold in the rest of the whites.
  • Pour the batter over the caramelized apples, ensuring it’s spread evenly over the surface of the pan.
  • Bake in the preheated oven for 10 minutes. The batter should rise significantly (similar to a soufflé) and be golden brown on top when you take the pancake out.
  • While it’s still hot, cover the pan with a plate and turn pancake over onto the plate. Serve with freshly whipped cream, vanilla ice cream or just as is.

8757573426_67378ee908_z

Savoury Beef Stew with Champ

While my friends and family have been enjoying unseasonable warmth in Toronto, Victoria and Cape Breton these past few weeks, we haven’t had a day warmer than 19 degrees so far in Ireland. Not that I’m complaining about the weather – I’m actually relishing the fact that my final months of pregnancy won’t be spent in the 40 degree sauna that is a Toronto summer. In total fairness, we’ve had very few awful days since we moved.

That said, my winter cooking habits haven’t changed all that much, even though it’s spring. The chill in the air, most days, is enough to make me want to curl up on the couch, in front of the fireplace with a big, hot bowl of something stodgy. Hence this beef stew.

I grew up on stews. When I was a kid, I hated them.

Turnip? I wouldn’t touch the stuff.

When I got older, as one does, I started craving them. But not necessarily the ones I grew up on (which are more like East Coast boiled dinners – another post for another time). I craved rich, caramelized flavours and well reduced sauces. Fork-tender vegetables and falling-apart chunks of chicken, beef or lamb. When I learned the proper technique for stew-making in culinary school, I never looked back.

Instead of chopping potatoes and adding to the stew, I prefer to make a mash and serve it alongside. Champ has been one of the most enjoyable Irish food discoveries I’ve come across over the years – a creamy mash mixed with chopped scallions. Enlivened with buttermilk and a knob of fresh butter, it’s the perfect accompaniment to this rich, meaty stew.

8743105963_4f9c2d5b30_z

Savoury Beef Stew with Champ

For the stew:

1 lb beef brisket, cut into cubes

1/2 pkg streaky bacon (or lardons), roughly chopped

1 large onion, diced

2 cloves garlic, minced

1 Tbsp olive oil

1 Tbsp butter

1 Tbsp tomato paste

1 bay leaf

1 sprig thyme

1 sprig rosemary

1 L (4 cups) beef stock

Salt & Pepper

1 medium rutabaga, cut into 1 inch cubes

2 large carrots, cut into 1 inch cubes

Juice from one large lemon

For the champ:

6-8 potatoes, peeled and cut into large chunks

1/4 cup buttermilk

1/4 cup butter

Salt and Pepper

1 bunch scallions, finely sliced

Directions:

  • In a large pot or Dutch oven on the stove top, heat olive oil on medium. Add streaky bacon (or lardons) and fry until the fat has rendered and the bacon is cooked. Remove bacon from the pot, but leave in the grease.
  • Turn the heat up to high and add the beef. Brown the beef completely on all sides (if the bits on the bottom of the pot are getting too dark, adjust the heat accordingly). When the beef is browned, remove from the pot.
  • Turn the heat back down to medium. Add the butter and chopped onion. Allow onion to cook for about a minute, then add garlic, bay leaf, thyme and rosemary. Continue to cook on medium for 5 minutes, or until the onion is tender and browning from the fond on the bottom of the pot.
  • Add tomato paste and stir to incorporate. Add back into the pot the beef and bacon, including all the drippings and juice from the meat.
  • Add the beef stock and stir the pot until everything has melded. Bring to a boil.
  • Once boiling, turn the heat down to a simmer. At this stage, you can transfer the contents to a slow cooker or just keep everything in the pot. Cover and allow to simmer for 1.5 hours.
  • While the meat is simmering, peel, wash and chop the rutabaga and carrots. Set aside.
  • Peel, wash and chop the potatoes. Put them into a separate pot and cover with water. Set aside.
  • Slice the scallions and set aside.
  • After 1.5 hours, remove the lid from the pot. Simmer uncovered for 30 minutes (to start reducing the sauce).
  • After 30 minutes, add the rutabaga and carrots. Continue to simmer for another 30-45 minutes.
  • While rutabaga and carrots are cooking, bring the pot of potatoes to a boil. Boil until tender, about 20 minutes.
  • After 45 minutes, if your sauce has not reduced enough to coat the back of a spoon, turn the heat up and allow to boil and reduce, stirring occasionally to avoid anything sticking to the bottom of the pan.
  • Once the sauce has reduced to your liking, pick out the bay leaf, thyme and rosemary. Adjust the seasoning with salt, pepper and  lemon juice.
  • When the potatoes are fork tender, drain and mash with butter. Add the buttermilk and season with salt and pepper. Add in the scallions and whip everything together.
  • Serve the stew over the champ (the stew is even better the next day so save your leftovers!).